
There is also no quicker way to kill the enthusiasm of a BBQ than to produce burnt out or undercooked food. What is one of the most popular grilling mistakes? There is no way to measure grill temperature. Whether you’re using charcoal or gas, or have a smoker, the exact control of heat is the magic that separates a perfect grilled steak from one that will make you go nuts due to uneven heating.
An infrared thermometer can come into play here. It is an easy-to-use device that allows you to know the surface temperatures without contact instantly. This guide will demonstrate how an IR thermometer will allow you to prevent overheating, cook more consistently, and grill like a pro.
Why Temperature Control Matters in Grilling?
Grilling is a matter of time and temperature. Too hot and you might cook the outside of your food, and the inside remains undercooked. Too cold, and your food is already dried out before it can even be cooked to a safe temperature.
What is even more important is that grills usually contain hot and cold areas, particularly when using indirect heat or cooking over charcoal. Unless you’ve checked those zones, you won’t be sure where to place your meat to achieve searing or slow cooking beautifully.
However, it is not only the quality of food that can be affected by an overheated grill, which can warp grates, ruin non-stick surfaces, and even erupt into a flare-up or, worse yet, a dangerous grease fire. It is not only useful, but essential to use a gadget that lets you control the temperature.
How an Infrared Thermometer Works
An infrared thermometer (also known as an infrared temperature gun or IR thermometer) is a temperature instrument that measures the amount of infrared energy being emitted by surfaces. Simply put, it is a measure of heat without touching the object.
Simply aim the thermometer probe at the cooking surface (such as a grill grate), pull the trigger, and the temperature indicator will display the reading immediately. The rest of the models actually have a laser pointer to indicate precisely where you are pointing.
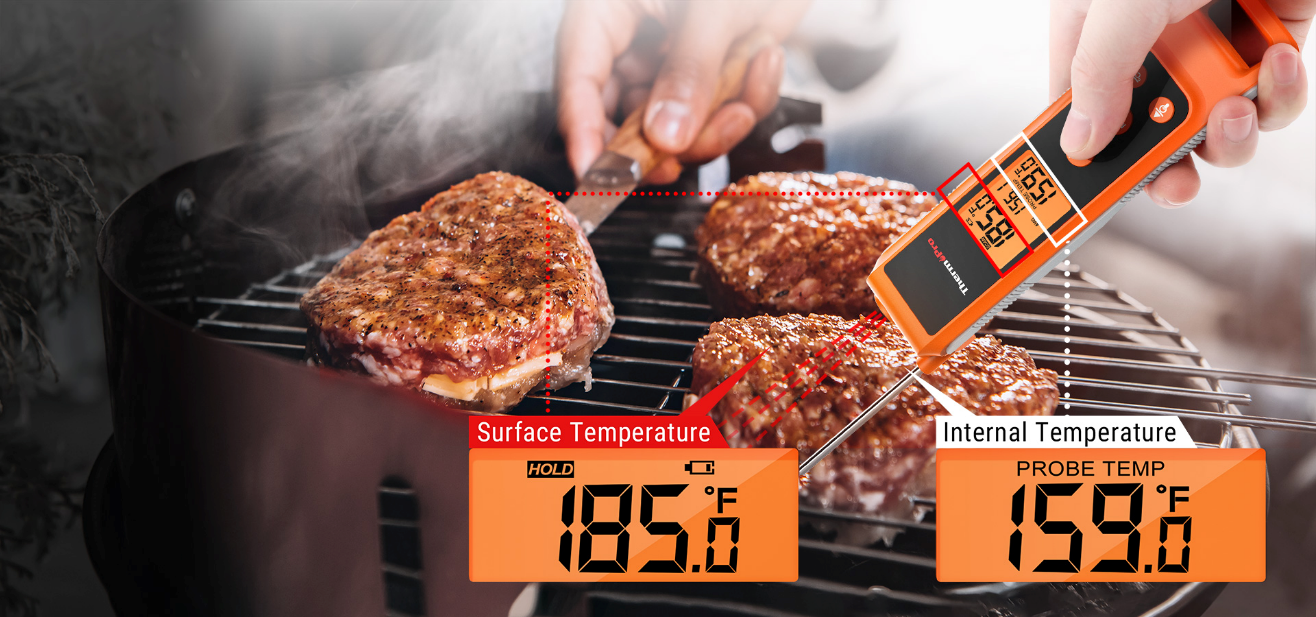
An IR thermometer displays the actual grate or surface temperature, the one that counts when your food touches the metal-as compared to a built-in grill thermometer whose reading is usually only the temperature of the air under the lid. An excellent option is the ThermoPro TP420 Infrared Thermometer Gun. This thermometer utilizes a combination of surface reading and a probe to measure the internal temperature of the product.
Simply put, ThermoPro TP420 IR Gun is an excellent to adamant grillers.
Common Grill Mistakes You Can Avoid
Most home grillers make one of these classic mistakes:
- Not preheating properly: Just because the grill has been on for 10 minutes doesn’t mean the grates are hot enough.
- Relying on lid thermometers: They read the air temperature near the top, not the cooking surface.
- Guessing by feel: Waving your hand over the grill is risky and wildly inaccurate.
Using an IR thermometer solves all these problems. You can measure grill temperature and know exactly when your grill is ready. You can also ensure that each section is cooking at the right temperature.
How to Use an Infrared Thermometer on a Grill
Using an IR thermometer is easier than you think. Here’s how to do it right:
- Open the grill lid to expose the cooking surface.
- Aim the IR thermometer at the center of the grate.
- Pull the trigger and measure grill temperature.
- Scan multiple areas, such as left, right, and center, to find any hot or cold zones.
- Wait 5–10 minutes, then re-check to confirm stability.
👉 Pro Tip: Make sure the grates are clean. Grease or residue can throw off readings. Also, be aware of the distance-to-spot ratio. For example, a 12:1 ratio means you should stand 12 inches away to measure a 1-inch spot.
Ideal Grilling Temperatures by Cooking Style
Not all food cooks at the same temperature. Use your IR thermometer to fine-tune different zones of your grill:
- High Heat (450–550°F): Searing steaks, burgers, or thin-cut chops.
- Medium Heat (350–450°F): Grilled chicken, vegetables, kebabs.
- Low & Slow (225–275°F): Ribs, pork shoulder, brisket on indirect heat or smokers.
Create multi-zone setups and use your thermometer to verify that each section is dialed in before cooking.
Extra Tips for BBQ & Grill Success
- Couple the IR thermometer to a meat probe thermometer to have total control.
- Apply it to griddles, pizza stones, pans, or even cast-iron skillets and pre-cook them.
- When cooking for a long time, be sure to check the temperature every 10-15 minutes to prevent spikes or declines.
- For smokers, use it to inspect the air intake and exhaust surfaces, as well as the cooking grate.
Conclusion
So, this article was all about how to avoid overheating in grill and BBQ with an IR Thermometer.
To recap…
Grilling is half art and half science, and the science element of it is temperature. And in case you ever speculated or wished that your grill was hot enough, then it is time to take a step further. Using an infrared thermometer allows you to accurately track the temperature of your cooking space, prevent overheating, and achieve the desired results consistently. Whether flipping burgers, smoking brisket, or igniting the grill to craft a weekend feast, this tool helps you cook smarter, safer, and better.