
Nothing feels better than running a store that stays organized and easy to manage. Setting up a multi location inventory plugin in WooCommerce becomes simple once you pick the right tool and follow a few clear steps. You install and activate the plugin, create your locations, assign products, and add a location selector so customers see stock based on their area.
You can also show stock by location on product pages, set up managers for each branch, and watch everything from one dashboard. The plugin sends alerts for low stock, helps you restock faster, and keeps every store updated without confusing manual work.
If you want smoother stock control across every location, now is the best time to start. Follow this simple guide on how to setup a multi location inventory management plugin and keep your store running with less stress. But first, let’s understand why you need these plugins.
Why You Need Multi-Location Inventory Management for Your Store?
Multi location inventory management helps you track products in different places through one simple system, so you always know what is available and where it is stored. This reduces mistakes, avoids extra work, and stops problems like missing items or too much stock. It makes your daily operations smoother and keeps everything organized.
It also improves customer service because you can send orders from the closest location, which makes delivery faster and more reliable. If one place runs out of an item, another place can quickly cover it, so customers get what they want without delays. This creates a better shopping experience overall.
For your business, it lowers costs and supports growth by helping you balance stock between all locations. You avoid wasting storage space, reduce shipping costs, and prevent sudden restocking problems. It also makes it easier to add new locations in the future and keeps your business steady during unexpected issues.
How to Setup a Multi Location Inventory Management Plugin?
Setting up a multi-location inventory management plugin in WooCommerce is easier than it seems. The first and most important step is choosing the right plugin. There are many multi-location plugins available in the market, and selecting the right one can be challenging.
But don’t worry — for this guide, we’ll use Multi Location Product & Inventory Management for WooCommerce. This plugin is lightweight, meaning it won’t slow down your site, and best of all, it requires no coding knowledge to install or use.
Another great thing about this plugin is that it offers a free version with many useful features. If you want more advanced tools and flexibility for your inventory system, you can easily upgrade to the premium version later. This WooCommerce multi locations inventory management plugin helps you manage stock across several warehouses, keep inventory accurate, and ensure customers always see the correct product availability based on their location.
This step-by-step guide will show you how to install, set up, and use this plugin effectively.
System Requirements
Before installing the plugin, make sure your server meets these requirements to ensure smooth performance:
| Requirement | Minimum Version |
| WordPress | 5.0 or higher |
| WooCommerce | 4.0 or higher |
| PHP | 7.2 or higher |
| MySQL | 5.6 or higher |
If everything meets or exceeds these versions, you’re good to move ahead.
Installing the Plugin
You can install the Multi Location Product & Inventory Management for WooCommerce plugin directly from your dashboard or upload it manually.
There are two ways to install it — through the dashboard or via manual upload.
Option 1: Install via WordPress Dashboard
- Log in to your WordPress admin panel.
- Navigate to Plugins → Add New.
- In the search bar, type Multi Location Product & Inventory Management.
- Locate the plugin from the results.
- Click Install Now.
- After installation, click Activate to enable the plugin.

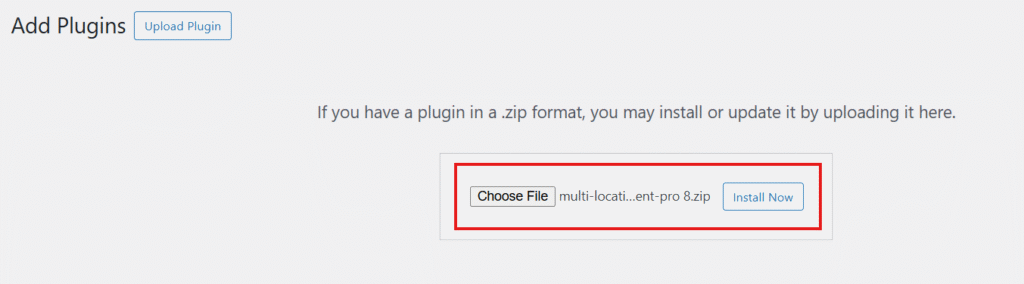
Option 2: Install via Manual Upload
- Download the plugin ZIP file from the WordPress Plugin Directory (search for Multi Location Product & Inventory Management).
- In your WordPress dashboard, go to Plugins → Add New → Upload Plugin.
- Click Choose File, select the downloaded ZIP, and click Install Now.
- Once the installation completes, click Activate Plugin.
If you have purchased the Pro version, you’ll also receive a license key after payment.
To activate your premium features:
- Go to Location Manage → Settings → Plugin License.
- Paste the license key you received.
- Click Activate License to unlock all the Pro features.
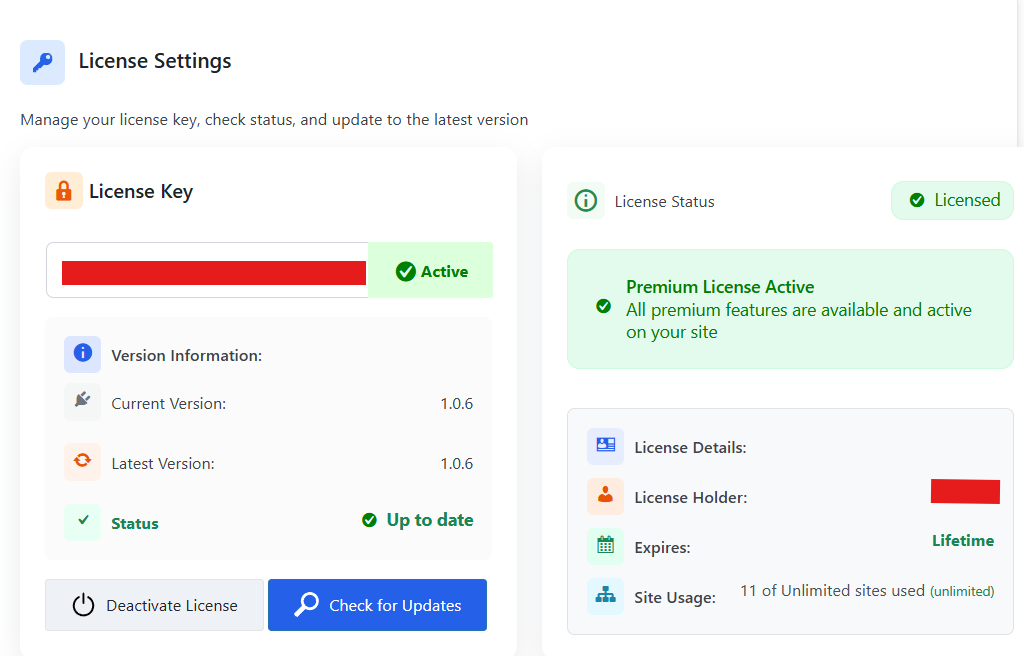
Once done, your plugin is fully installed and ready for setup.
Setting Up Multi-Location Inventory
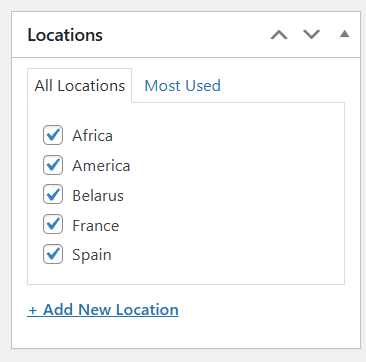
After installation, it’s time to set up your inventory locations. First, you have to create locations. Here’s how you can do it:
- Go to Location Manage → Locations from your dashboard.
- Fill out all the necessary information for each location (for example, name and description).
- Click Add New Location once done.

You can create as many locations as you need. After you finish adding your locations, the next step is assigning products to each location.
Assigning Products to Locations
Once you’re done creating the location, it’s time to assign the products for each location. To do so:
Go to Products → All Products and edit each product individually.
- On the right-hand side, look for the Location section.
- Here, you’ll see all the locations you’ve created earlier. You can also add new locations if needed.
- In the Product Data section, click Inventory and check Track stock quantity for this product.
- A new field will appear — enter the total quantity for that product.
- Next, go to Location Settings, and you’ll find the locations you selected.
For each location, fill in the following details:
- Stock Quantity
- Regular Price
- Sale Price
- Backorders
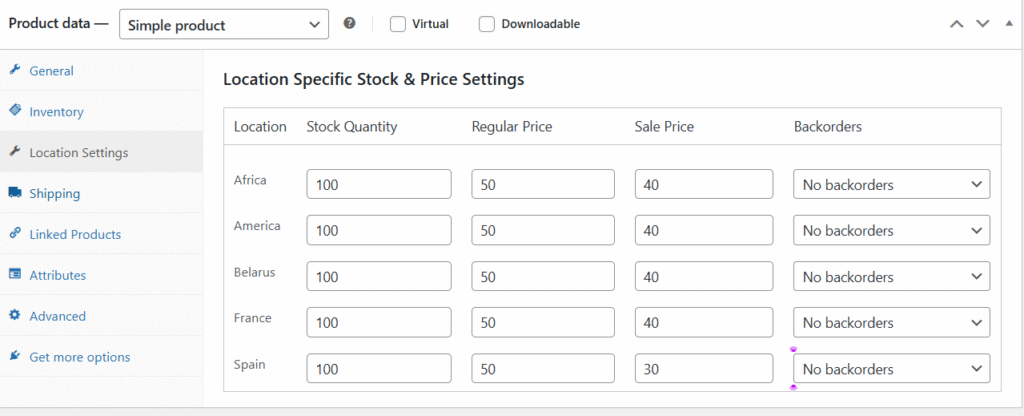
Once everything is filled in, click Update.
You’ll now be able to see stock levels and prices for each product based on location.
Adding a Location Selector to Your Store
You can make it easy for customers to choose their location, so they only see products available in that specific area. The plugin allows you to do this in two simple ways.
Method 1: Add Location Selector Using Widgets
This is the easiest and fastest way to add a location filter to your site’s header.
- From your WordPress dashboard, go to Appearance → Widgets.
- Find the Header section.
- Click the + icon and search for Shortcode.
- Add the block, then paste this shortcode inside it [[mulopimfwc_store_location_selector title=”Select Your Location”]]
(Remove any extra square brackets if shown.)
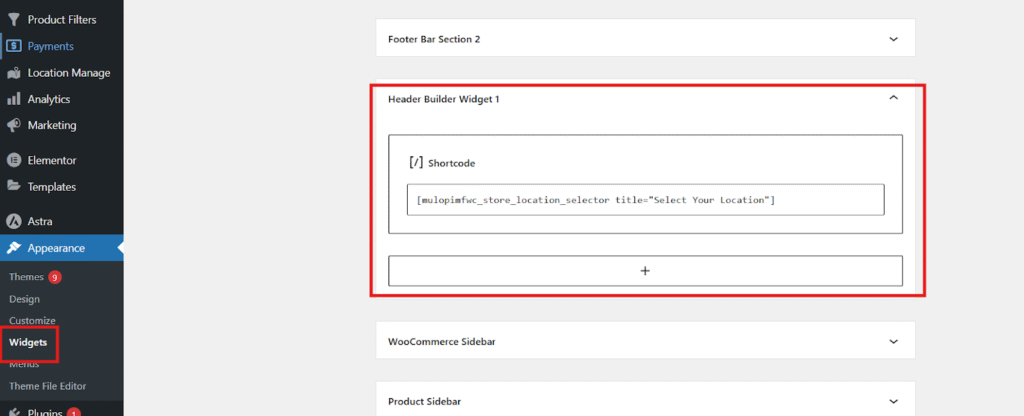
- Click Publish or Update to save your changes.
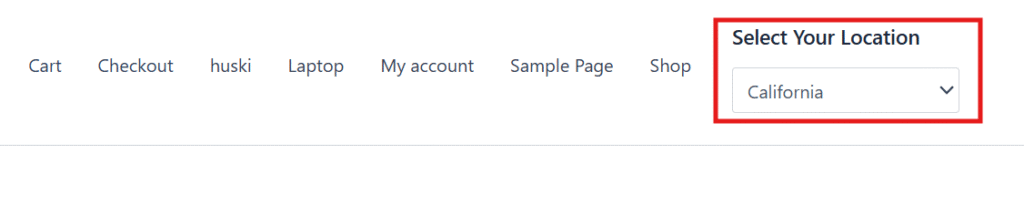
Now, when you visit your online shop, you’ll see a “Select Your Location” dropdown menu at the top. Customers can use this to choose their preferred store or location.
Method 2: Add Location Selector by Customizing the Shop Page
If your theme doesn’t have a header widget option, don’t worry — you can add the selector through the Customizer.
Here’s how:
- Open your Shop Page in WordPress.
- Click Customize at the top of the page.
- Inside the Customizer, look for the Header section.
- Hover your mouse over the bottom part of the header — a + icon will appear.
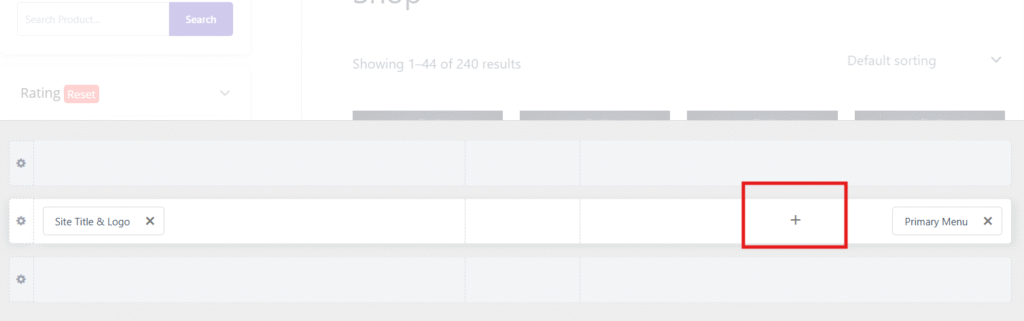
- Click it and choose any widget area (Widget 1, 2, or 3).
- Add a Shortcode block and paste the same shortcode [[mulopimfwc_store_location_selector title=”Select Your Location”]]
(Remove extra brackets before saving.)
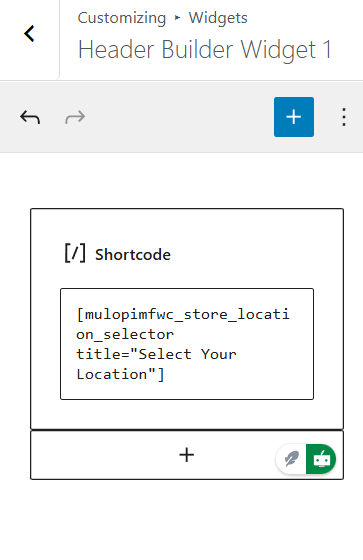
- Click Publish, Save Draft, or Schedule depending on your work stage.
After saving, go back to your shop page, and you’ll now see a location selector dropdown just like in Method 1. When customers pick a location, your store will automatically filter and show products available only in that area.
Showing Location-Wise Stock on Product Pages
You can also display stock details per location on single product pages.
- Go to Location Manage → Settings → General.
- Find Location Display Format.
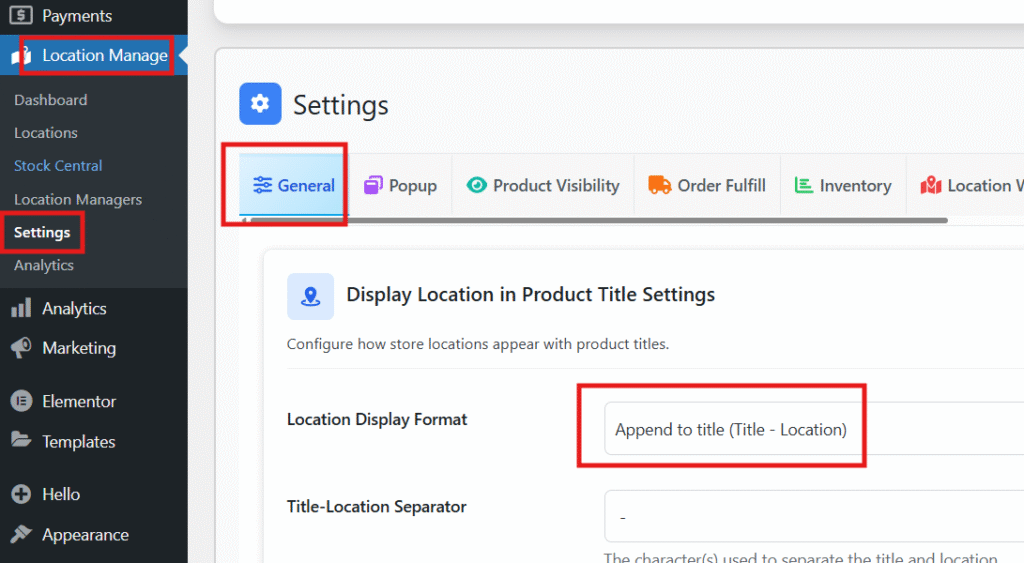
- Choose your preferred display style and click Save Changes.
Now, each product page will show location-based stock information for your customers.
Creating Location Managers
If your store has many locations, managing everything alone can be tough. This plugin allows you to assign Location Managers to handle specific branches or warehouses.
To create a manager:
- Go to Location Manage → Location Managers.
- Click Add New Location Manager.
- Fill in the manager’s details.
- Assign the location and set their permissions for what they can control.
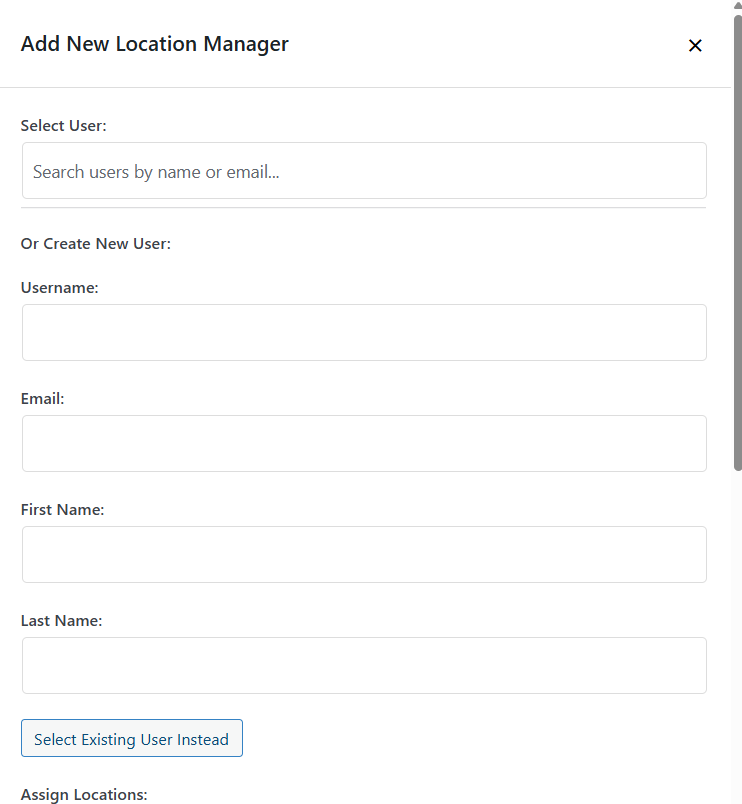
- Click Save Manager.
Then, go to Users → All Users — you’ll find the new manager there.
- Click Edit, set a password, and share the username and password with the manager.
They’ll now have access only to the locations and permissions you assigned. You can add multiple managers this way to make operations smoother.
Dashboard and Notifications
The plugin includes a built-in dashboard that helps you monitor everything easily.
From here, you can:
- View product stock levels for each location.
- Get notifications for products that are low in stock or out of stock.
- Restock products efficiently without relying on manual spreadsheets or notes.
This keeps your store inventory accurate and updated across all branches. And this is how you can set up a multi-location inventory management plugin.
Key Features to Look for in a Multi-Location Inventory Plugin
When you choose a multi location inventory plugin, you should look for features that help you keep your stock updated, organized, and easy to manage. These features help you run your store smoothly and give your customers a better shopping experience.
- Real-time Stock Sync: This keeps your product counts updated across every location, so you avoid selling items you do not actually have and keep everything accurate.
- Warehouse Management: This helps you organize products by storage areas, making it easier to control incoming stock, track movement, and keep each location in good order.
- Location-based Pricing: This lets you set different prices for different areas, which helps you match local demand and stay flexible with your overall store strategy.
- Shipping Control: This allows you to pick the best shipping location for each order, so customers get faster delivery and you save money on transport.
- Order Routing: This helps you send orders to the right place for faster processing, which leads to fewer mistakes and smoother daily operations.
- Low Stock Alerts: This gives you quick notifications when items run low, helping you reorder on time and prevent problems like empty shelves or slow restocking.
- Role Permissions: This lets you control who can access certain inventory areas, which improves safety, keeps tasks organized, and reduces mistakes during daily work.
Picking the right features makes a big difference in how well your store runs. A strong plugin keeps stock updated, cuts mistakes, and helps you manage every location with less effort and better confidence.
Common Mistakes to Avoid When Setting Up Multi-Location Inventory
Many store owners make simple mistakes when setting up many locations. These mistakes can create problems that slow the whole system down. You can avoid trouble if you know what to look for early. Keep reading to learn what to watch out for below.
Duplicate Product Entries
When the same product is added more than once, it creates stock errors that confuse the system. Your reports will show wrong numbers, and your team may reorder items you already have. Check product lists often to remove repeats. A clean product list makes tracking simple and helps every location stay in sync.
Unsynced Stock Data
If stock counts do not match across locations, you will face issues with orders and stock plans. This can lead to selling items you do not have or missing sales when stock is actually ready. Regular checks help keep counts correct. Good syncing makes your store run without stress or delays.
Incorrect Warehouse Mapping
Wrong mapping sends orders to the wrong place and slows down shipping. It can also cause extra transport costs and delays that upset customers. Always double-check each warehouse link before going live. Clear mapping helps every order reach the right spot without mix-ups.
Poor Staff Permissions
If everyone can access everything, mistakes happen more often and become harder to trace. Setting the wrong roles allows staff to edit stock they should not touch. Use clear limits so people only work in their own areas. This keeps stock numbers steady and workflow clean.
No Low Stock Alerts
Missing alerts means you may run out of items before you notice the problem. This leads to slow orders and unhappy buyers. Alerts act like a simple early warning that saves time and money. Turning them on keeps shelves full and orders moving fast.
Mixing Up Similar Products
Items that look alike can get placed in the wrong spot or counted the wrong way. This mix-up creates wrong reports and delays during order picking. Simple labels and clear names help avoid these issues. Good product labeling makes your stock easy to check and move.
Skipping Regular Audits
Without audits, small errors build up and turn into bigger problems later. You may miss wrong counts, lost items, or product mix-ups. A short check each week keeps your numbers clean. Regular audits also help you fix issues before they affect customers.
Good setup helps keep your store running strong and smooth. These mistakes are easy to avoid with a little care. Use simple checks to keep every location in good shape. Small steps now will save time and stress later.
Conclusion
Running many store locations can feel much easier when you use the right tools that keep everything clear and steady. With simple steps like installing the plugin, creating locations, assigning products, and adding a selector, you can manage stock without stress. Now you know how to keep every place updated, and this also answers how to setup a multi location inventory management plugin?
You can keep your store working smoothly by checking stock often, using clear labels, giving the right roles, and turning on alerts to stay ahead. A little care goes a long way and keeps your store simple to handle. Keep growing at your own pace, and I hope your setup turns out great.