
The quality of your coffee begins long before water touches the grounds—it starts with how you grind your beans. Whether you’ve just purchased your first grinder or inherited one that’s been sitting in your cupboard, understanding how to use it properly can transform your daily brew from mediocre to exceptional. Many beginners feel overwhelmed by grind settings, burr types, and maintenance routines, but mastering your grinder is simpler than you might think.
This guide walks you through everything you need to know about coffee grinders, from identifying which type you own to selecting the perfect grind size for your brewing method. You’ll learn practical techniques for adjusting settings, maintaining your equipment, and troubleshooting common problems that affect grind quality. By the end, you’ll have the confidence to extract the full potential from your coffee beans, ensuring every cup delivers the flavor and aroma you’re seeking. Let’s unlock the secrets to consistent, delicious coffee through proper grinding technique.
Understanding Your Coffee Grinder
Your coffee grinder is the most critical piece of equipment in your brewing arsenal, yet it’s often the most misunderstood. At its core, a grinder does one thing: breaks whole coffee beans into smaller particles to increase surface area for extraction. However, the way it accomplishes this task dramatically affects your coffee’s flavor. The key difference lies in whether your grinder uses blades or burrs. Blade grinders work like a blender, chopping beans with spinning blades that create inconsistent particle sizes. Burr grinders, on the other hand, crush beans between two abrasive surfaces at a set distance apart, producing uniform grounds that extract evenly.
Understanding your grinder’s mechanism helps you recognize its limitations and capabilities. If you notice some particles are powder-fine while others remain chunky, you’re likely dealing with a blade grinder or a burr grinder that needs adjustment. Consistency matters because during brewing, smaller particles extract faster than larger ones. When your grind is uneven, some coffee becomes over-extracted and bitter while other portions remain under-extracted and sour, creating a muddled, unbalanced cup. Before you can optimize your grinding technique, spend time examining your grinder’s construction, locating the adjustment mechanism, and identifying whether it uses flat burrs, conical burrs, or blades. This knowledge forms the foundation for every grinding decision you’ll make.
Types of Coffee Grinders
Coffee grinders fall into three main categories, each suited to different needs and budgets. Blade grinders are the most affordable and compact option, using a propeller-like blade that spins at high speed to chop beans. While convenient, they produce uneven grounds and generate heat that can affect flavor. Burr grinders represent the gold standard for home brewing, available in two configurations: flat burr and conical burr. Flat burr grinders feature two parallel rings with sharp ridges that grind beans as they pass between them, offering precision and uniformity. Conical burr grinders use a cone-shaped burr that sits inside a hollow outer burr, grinding beans as they spiral downward through the gap.
Most coffee enthusiasts recommend burr grinders because they deliver consistent particle size, which is essential for proper extraction. Conical burrs tend to be quieter and work well across all grind sizes, from espresso to French press. Flat burrs excel at producing highly uniform grounds, particularly for espresso, though they typically cost more and run louder. Your choice depends on your brewing method, budget, and how much you value grind consistency in your daily routine.
Manual vs. Automatic Grinders
The decision between manual and automatic grinders comes down to convenience versus control. Manual grinders require you to turn a hand crank to grind coffee beans, which takes physical effort and time—typically one to two minutes for a single serving. They’re portable, quiet, and don’t require electricity, making them ideal for travel or small kitchens. Most manual grinders use conical burrs and offer surprisingly consistent results despite their simple construction. They also tend to be more affordable than quality electric grinders, though premium hand grinders can rival automatic models in precision and durability.
Automatic grinders handle the work for you at the push of a button, grinding your desired amount in seconds. They’re perfect for busy mornings or when preparing coffee for multiple people. Electric grinders typically offer more grind settings and can accommodate larger quantities of beans. However, they take up counter space, require cleaning of electrical components, and can be noisy during operation. If you brew one or two cups daily and enjoy the ritual of coffee preparation, a manual grinder provides excellent value and quality. For households with multiple coffee drinkers or those who prioritize speed and convenience, an automatic grinder becomes a worthwhile investment in your daily routine.
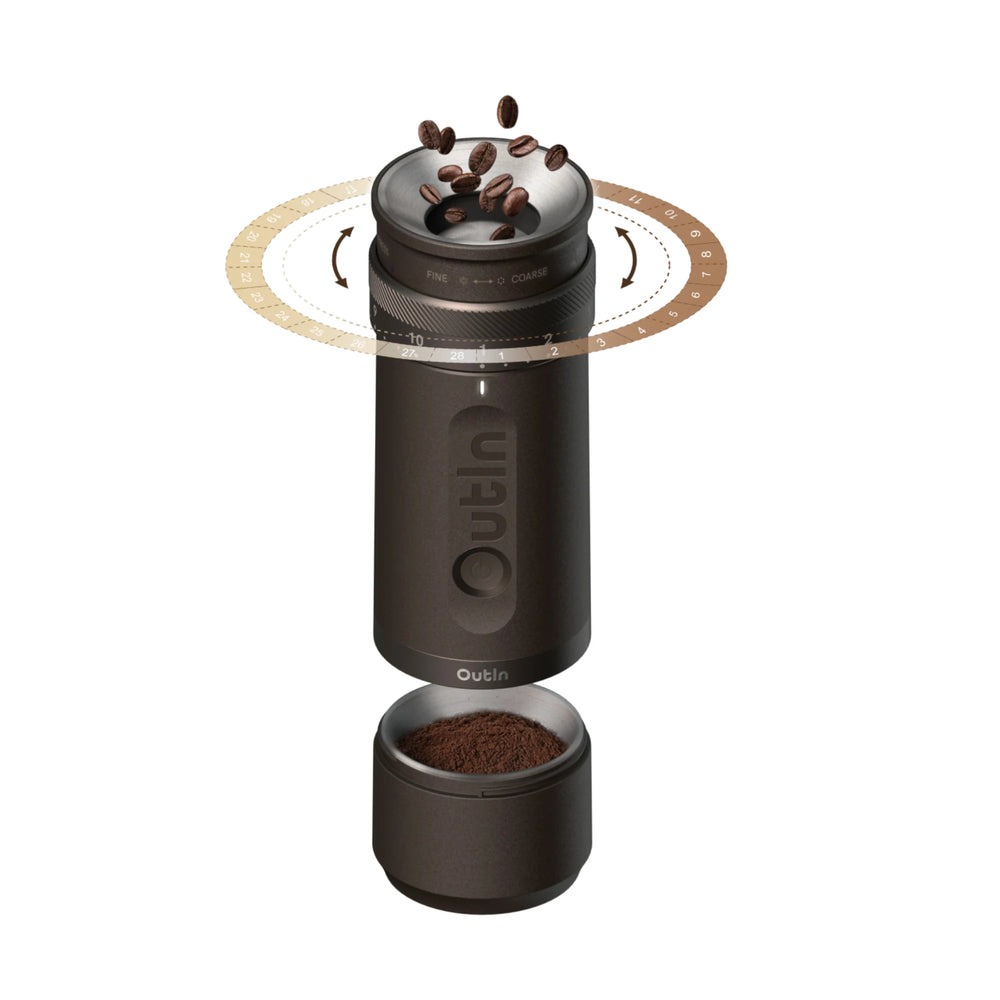
Choosing the Right Grind Setting
Selecting the correct grind size is where science meets art in coffee preparation. The grind setting determines how quickly water flows through your coffee and how much flavor it extracts along the way. Too fine, and water struggles to pass through, leading to over-extraction that tastes bitter and harsh. Too coarse, and water rushes through too quickly, resulting in weak, sour coffee that lacks body and sweetness. The ideal grind size creates just enough resistance to allow proper contact time between water and coffee, extracting the balanced flavors you’re after.
Your brewing method dictates your starting point for grind size. Espresso requires very fine grounds, similar to table salt, because water passes through under high pressure in just 25 to 30 seconds. Pour-over methods like V60 or Chemex need medium-fine grounds, resembling sand, to maintain a steady flow rate during the two to three-minute brew time. French press calls for coarse grounds, comparable to sea salt or breadcrumbs, since the coffee steeps in water for four minutes without a paper filter to catch fine particles. Cold brew uses extra-coarse grounds because the extended 12 to 24-hour steeping time would extract harsh flavors from finer particles.
Start with these baseline settings, then adjust based on taste. If your coffee tastes sour or weak, grind finer to increase extraction. If it tastes bitter or harsh, grind coarser to reduce extraction. Make small adjustments—moving just one or two notches on your grinder’s dial—and brew another cup to evaluate the change. Keep notes on which settings work best for each brewing method and coffee bean you use. Different beans have varying densities and moisture levels, so a setting that works perfectly for one coffee might need tweaking for another. This experimentation process teaches you to recognize the signs of proper extraction and develops your palate for distinguishing between under-extracted and over-extracted coffee.
Factors Affecting Grind Settings
Several variables beyond brewing method influence your ideal grind setting, and understanding them helps you adapt when your usual routine produces unexpected results. Bean freshness plays a significant role because recently roasted coffee releases more carbon dioxide during brewing, which can slow water flow and increase extraction time. Fresh beans often perform better with a slightly coarser grind than older beans, which have degassed and allow water to flow more freely. The roast level also matters—darker roasts are more porous and brittle, grinding finer and extracting faster than denser light roasts. If you switch from a medium roast to a dark roast using the same grind setting, you might notice increased bitterness because the dark roast extracts more quickly.
Water temperature and brewing technique introduce additional complexity. Hotter water extracts more efficiently, so if you’re brewing at lower temperatures, you might compensate with a finer grind to maintain proper extraction. Your pouring technique in manual methods affects how water channels through the coffee bed—aggressive pours can create pathways that allow water to bypass grounds, suggesting a finer grind to increase resistance. Even humidity affects grinding, as beans absorb moisture from the air and become slightly softer, changing how they break apart. During humid summer months, you might find your grinder produces more fines, requiring minor adjustments to your usual settings. By recognizing these interconnected factors, you develop the flexibility to achieve consistent results despite changing conditions, rather than rigidly following predetermined settings that don’t account for real-world variables.
Using a Grind Setting Chart
A grind setting chart serves as your roadmap when you’re learning to navigate your grinder’s capabilities. These charts typically organize brewing methods from finest to coarsest grind, providing visual references for particle size alongside recommended grinder settings. While specific numbers vary between grinder models, the relative relationships remain consistent. Most charts place Turkish coffee at the finest extreme, followed by espresso, then moka pot, pour-over, drip coffee, French press, and finally cold brew at the coarsest end. Use these charts as starting points rather than absolute rules, since your particular grinder, beans, and water will influence the optimal setting.
Create your own personalized chart by testing each brewing method you use regularly. Mark the setting that produces your best-tasting coffee for each method, noting the bean type and roast date for reference. Update this chart as you gain experience and your preferences evolve. Some grinders include numbered dials or click-stop adjustments that make it easy to return to specific settings, while others require visual estimation. If your grinder lacks clear markers, use a permanent marker or tape to indicate your preferred positions for different brew methods, eliminating guesswork during busy mornings when you just want consistent results without experimentation.
Maintaining Your Grinder
Regular maintenance is the difference between a grinder that performs consistently for years and one that gradually degrades your coffee quality without you realizing why. Coffee oils, known as cafestol and kahweol, accumulate on burrs and in the grinding chamber over time, creating a rancid film that affects flavor. These oils turn stale within days, imparting bitter, off-flavors to fresh beans as they pass through contaminated surfaces. Fine particles also build up in crevices and around adjustment mechanisms, eventually causing your grinder to jam or produce inconsistent particle sizes. A well-maintained grinder not only tastes better but also operates more smoothly and lasts significantly longer than one that’s neglected.
Establish a maintenance routine based on how frequently you grind coffee. Daily users should perform a quick brush-out weekly and a thorough deep clean monthly, while occasional users can extend these intervals. Pay attention to warning signs that your grinder needs attention: grounds that clump together indicate oil buildup, while unusual noises or difficulty adjusting settings suggest accumulated debris in the mechanism. Some grinders disassemble easily for cleaning, while others require more careful approaches to avoid damaging electrical components or misaligning burrs. Consult your grinder’s manual to understand which parts are removable and whether any components are dishwasher-safe, though hand-washing typically provides gentler, more thorough cleaning.
Beyond cleaning, proper maintenance includes checking burr alignment and monitoring for wear. Burrs gradually dull with use, typically requiring replacement after grinding several hundred pounds of coffee, though this varies by burr material and quality. Ceramic burrs last longer than steel but are more brittle and prone to damage from foreign objects. If you notice your grinder requires progressively finer settings to achieve the same extraction, or if grounds become increasingly inconsistent despite cleaning, your burrs may be wearing out. Replacing burrs restores your grinder to like-new performance and costs significantly less than purchasing a new grinder. Think of maintenance as an investment that protects your equipment and ensures every cup reflects the true character of your beans rather than the accumulated residue of past brews.
Regular Cleaning
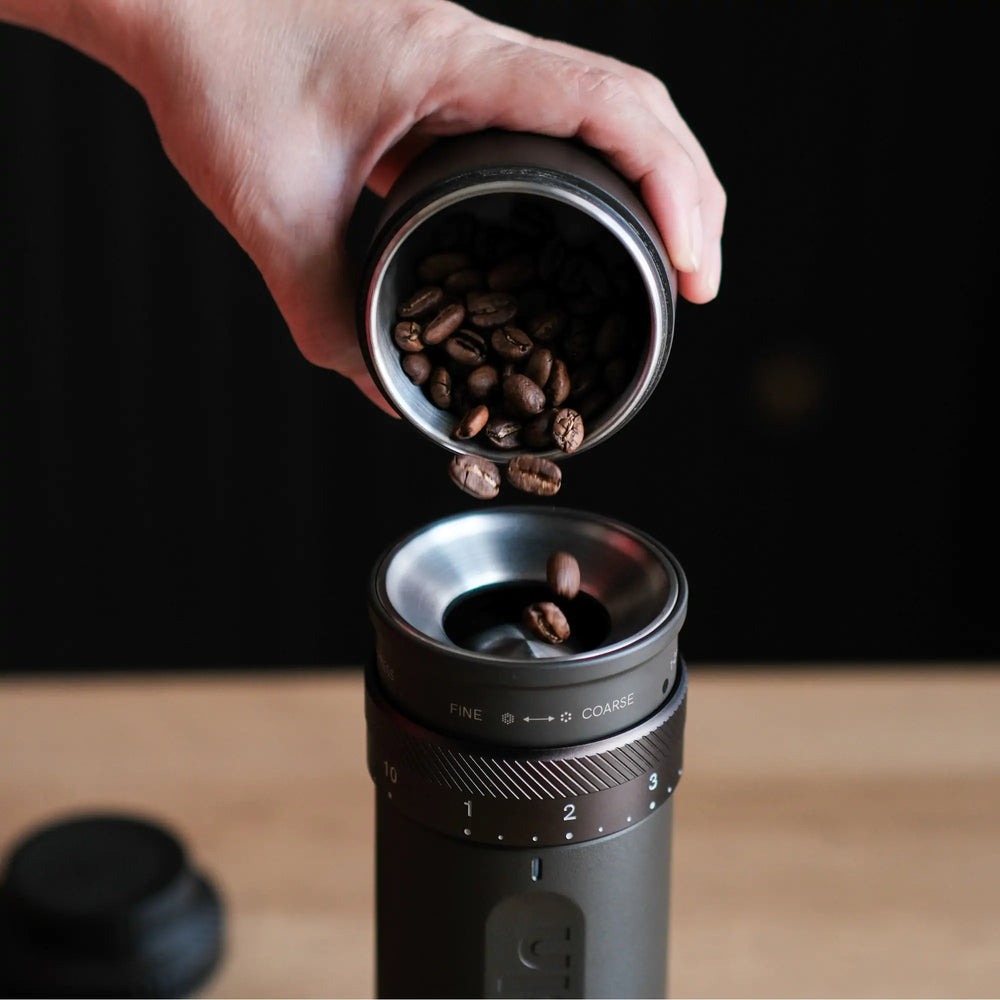
Cleaning your grinder properly requires the right tools and technique to remove residue without causing damage. Start with a soft brush—many grinders include one, or you can use a dedicated paintbrush or clean toothbrush—to sweep out loose grounds from the chamber, chute, and around the burrs after each use. This thirty-second habit prevents buildup and keeps your grinder running smoothly. For weekly cleaning, unplug your electric grinder and remove any detachable parts like the hopper and grounds container. Wash these in warm, soapy water, rinse thoroughly, and dry completely before reassembling, since moisture causes grounds to stick and can promote mold growth.
Monthly deep cleaning addresses oil accumulation on the burrs themselves. Remove the burrs according to your manual’s instructions—usually by unscrewing a retaining ring or releasing clips—and scrub them with a stiff brush and mild detergent, or use specialized grinder cleaning tablets that absorb oils as they pass through. These tablets look like beans and work by grinding through your machine, though they don’t replace physical cleaning of heavily soiled burrs. Wipe down all interior surfaces with a slightly damp cloth, ensuring no moisture remains before reassembly. Never submerge electrical components or use harsh chemicals that leave residues affecting coffee flavor. This systematic approach keeps your grinder hygienic and maintains optimal grinding performance.
Troubleshooting Common Issues
When your grinder misbehaves, identifying the root cause quickly prevents minor problems from becoming major failures. If your grinder produces inconsistent particle sizes despite proper settings, first check for accumulated coffee oils and debris around the burrs, as buildup prevents them from maintaining the correct gap. Clean thoroughly and test again. If inconsistency persists, examine the burrs for wear patterns or chips—damaged burrs require replacement to restore uniformity. Grinders that suddenly jam or make grinding noises often have foreign objects lodged between the burrs, such as small stones that occasionally hide among coffee beans. Never force a jammed grinder, as this can crack burrs or strip gears. Instead, unplug it, disassemble carefully, and remove the obstruction.
Static electricity causes grounds to cling to the chamber and create mess, particularly in dry environments or with light roasts. Reduce static by lightly misting beans with water before grinding—just a few drops from your fingertips or a spray bottle—or by using a grinder with anti-static features. If your electric grinder runs slowly or struggles to grind, the motor may be overheating from extended use or the burrs might need cleaning to reduce friction. Allow it to cool completely before trying again, and avoid grinding more than the recommended capacity at once. Grinders that won’t adjust properly often have coffee particles jamming the adjustment mechanism. Disassemble the adjustment ring, clean thoroughly, and apply food-safe lubricant if your manual recommends it.
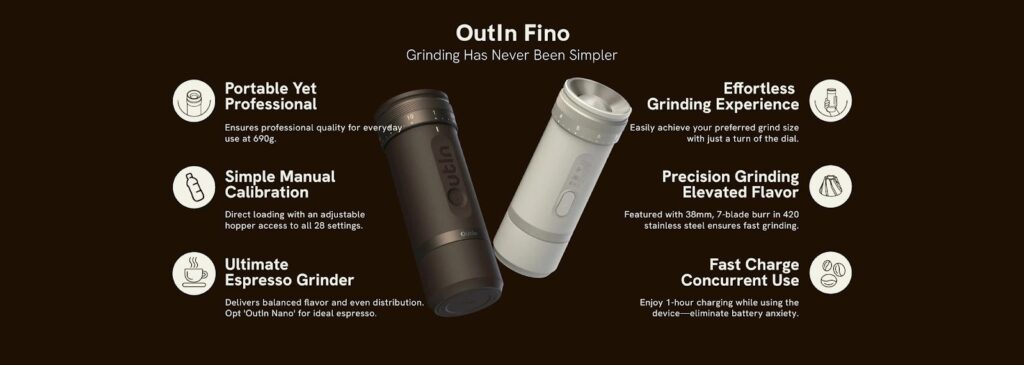
For persistent problems that cleaning doesn’t resolve, consider whether your grinder is appropriate for your needs. Blade grinders inherently produce uneven results, and no amount of troubleshooting will achieve burr-grinder consistency. Similarly, inexpensive burr grinders may lack the build quality for daily heavy use, eventually developing play in the burr mounting that prevents precise grinding. Sometimes the most practical solution is upgrading to equipment that matches your consumption level and quality expectations. Brands like OutIn have developed portable manual grinders with conical burrs that deliver consistent results for travelers and outdoor enthusiasts who need reliable grinding away from home, recognizing that a reliable grinder is a long-term investment in better coffee rather than an expense to minimize.
Achieving Coffee Excellence Through Proper Grinding
Mastering your coffee grinder transforms your brewing from guesswork into a reliable craft. You now understand the fundamental differences between blade and burr grinders, how to select appropriate grind settings for your brewing method, and why consistency matters for extraction. The techniques you’ve learned—adjusting settings based on taste, recognizing factors that influence grind quality, and maintaining your equipment through regular cleaning—give you the tools to troubleshoot problems and adapt to different beans and conditions. These skills develop with practice, so don’t expect perfection immediately. Each adjustment teaches you something about how grind size affects flavor, building your intuition over time.
The investment you make in understanding your grinder pays dividends in every cup you brew. Proper grinding technique unlocks flavors that remain hidden when beans are poorly prepared, revealing the nuances that roasters and farmers worked to develop. Start with the baseline settings recommended for your brewing method, then fine-tune based on your palate and preferences. Keep your grinder clean, replace worn burrs when necessary, and approach each brewing session as an opportunity to refine your technique. With these fundamentals in place, you’re equipped to consistently produce coffee that showcases the quality of your beans and rewards your attention to detail.